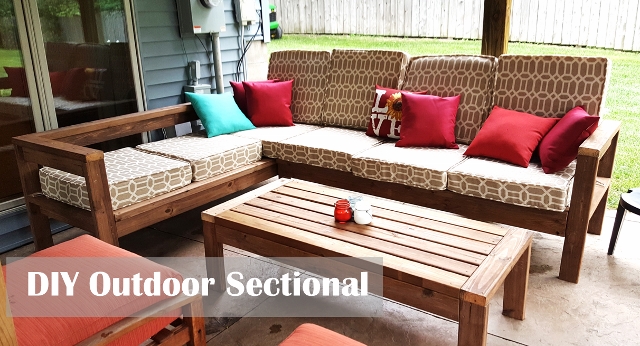
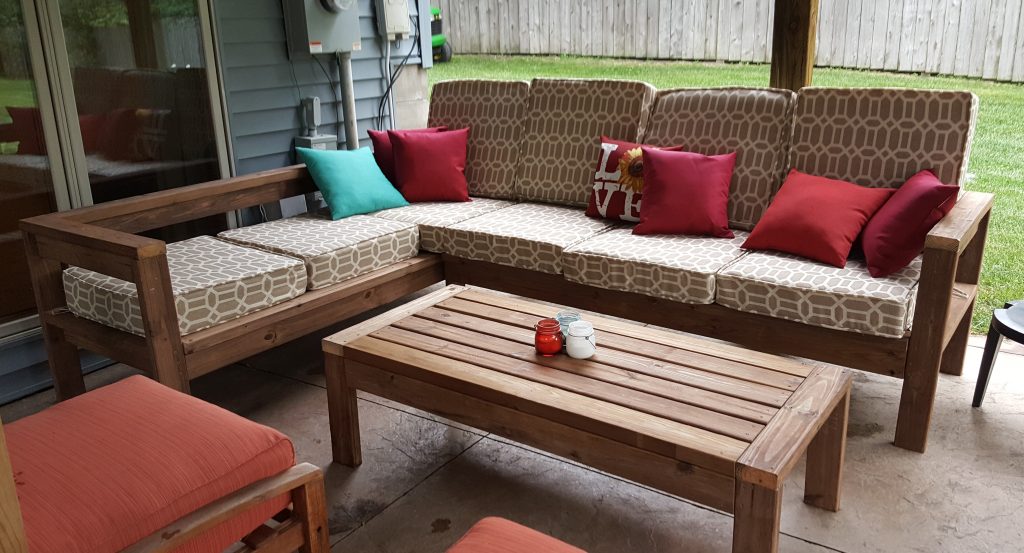
DIY Outdoor Sectional Couch
Fall always brings to mind very specific thoughts: hot chai tea lattes, cozy sweaters, snuggling around a bonfire or wrapped up in a blanket on our patio. Over the summer while working on putting together a comfortable and fun patio to hang out on we realized we needed to have adequate seating for the large parties we host throughout the summer and fall. What better seating than an outdoor sectional couch?! A new patio set easily runs $2,000-$3,000 which seemed outrageous to me so I looked into what it would take to build a DIY outdoor sectional from scratch. About a week later I created this!
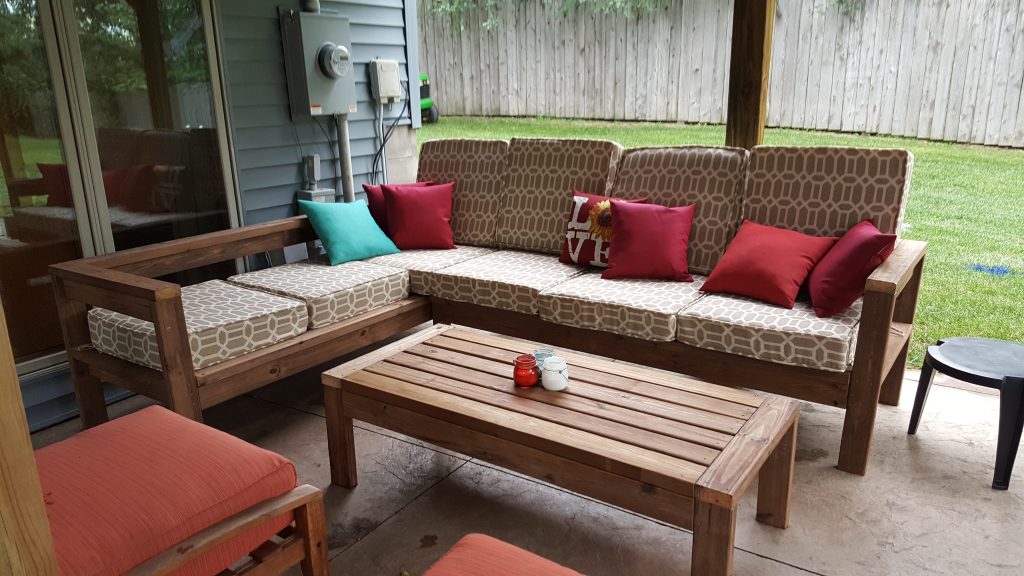
Here it is in all its pillow and cushion glory!
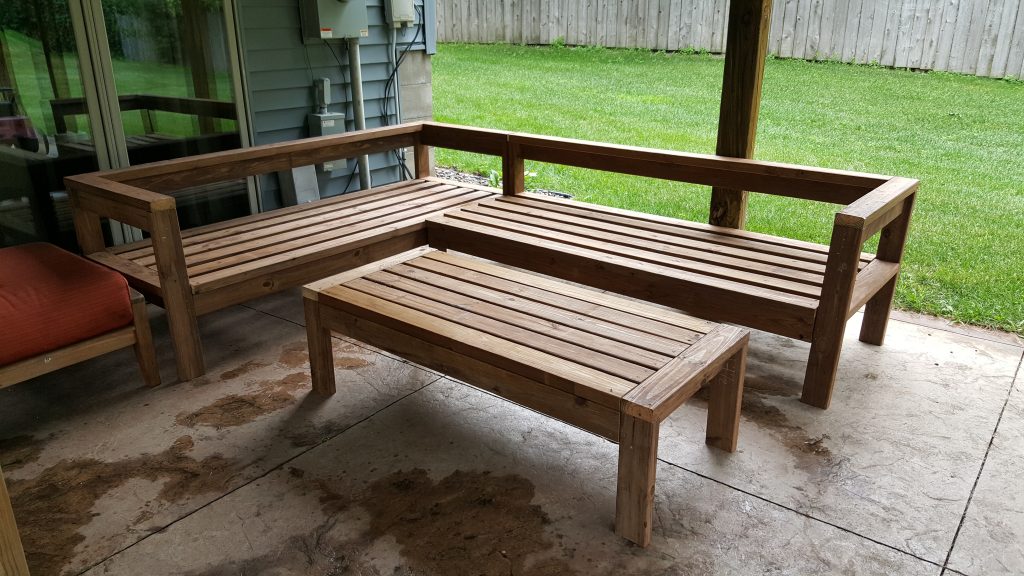
Believe it or not this couch was built entirely with 2×4’s which makes it sturdy and cost efficient. The structure is actually two separate couches, one full couch and one partial couch, meeting at the corner and I downloaded the plans from Ana White, who builds incredible furniture and often provides plans. Plans for the full couch are here. The plans were easy to follow, the build went smoothly, and I finished both pieces of the sectional couch in 3 days (would have been two but I had to buy an additional piece to finish). The plans for the second part of the section, the partial couch, can be found here.
If you are a first time builder newbie, scroll down to the bottom to see some first time builder tips from my own experiences 🙂
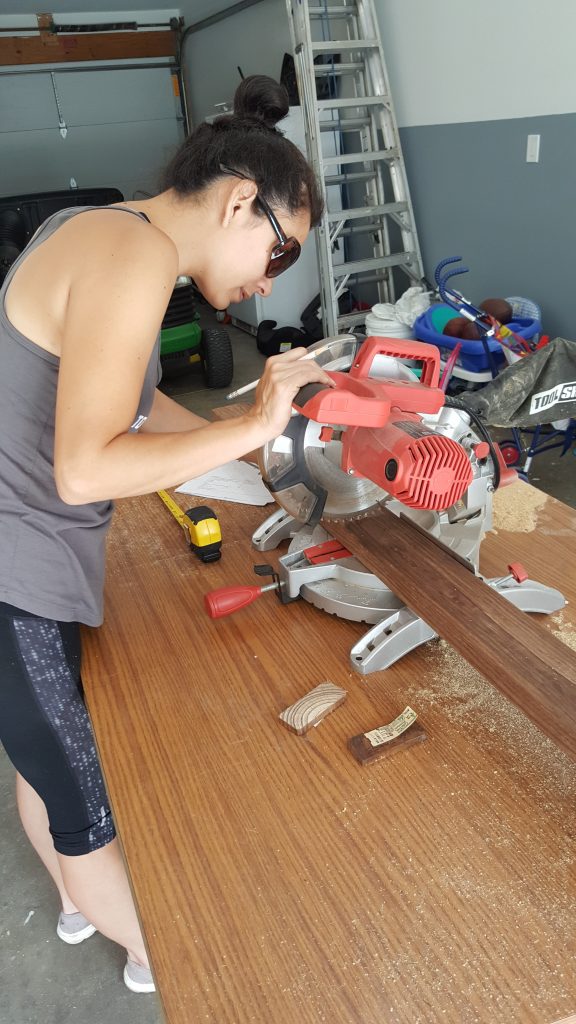
We ordered and purchased these 2×4’s from our local Home Depot and decided on using pre-treated cedar toned wood to save time by not needing to stain the wood. I used a miter saw to cut the pieces according to the plans. If you do not have access to larger tools such as a miter saw some places will cut the wood for you, and there are also some stores that have miter saws to rent.
Here are the all the plans used for this outdoor furniture collection, via Ana White:
- Full 2×4 Outdoor Couch
- 2×4 One Arm (partial) Outdoor Couch
- 2×4 Outdoor Coffee Table
- 2×4 Armless Outdoor Couch (for U shaped sectional)
Skip to the bottom to shop cushions and pillows for this sectional!
Tools Used:
- Saw (circular or compound miter saw) This is a well priced compound miter saw
- Compact Drill (I use this one)
- Impact driver (I use this one)
- Measuring tape
- Square
- 2 1/2″ decking screws
- Kreg Jig (needed only once on one of the couches) I used this one, however this one is a step up!
- 2 1/2″ pocket hole screws
- Pencil
- Wood glue (I use this wood glue)
- Printed plans
- Chalk
The Build
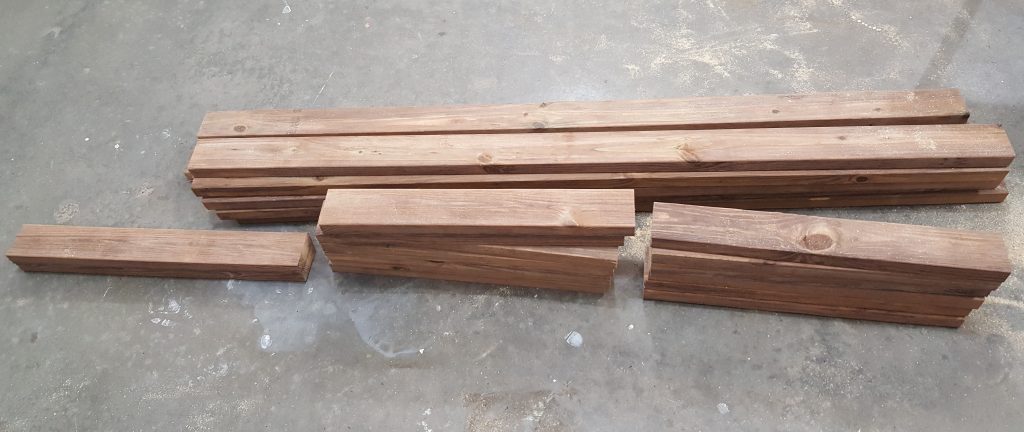
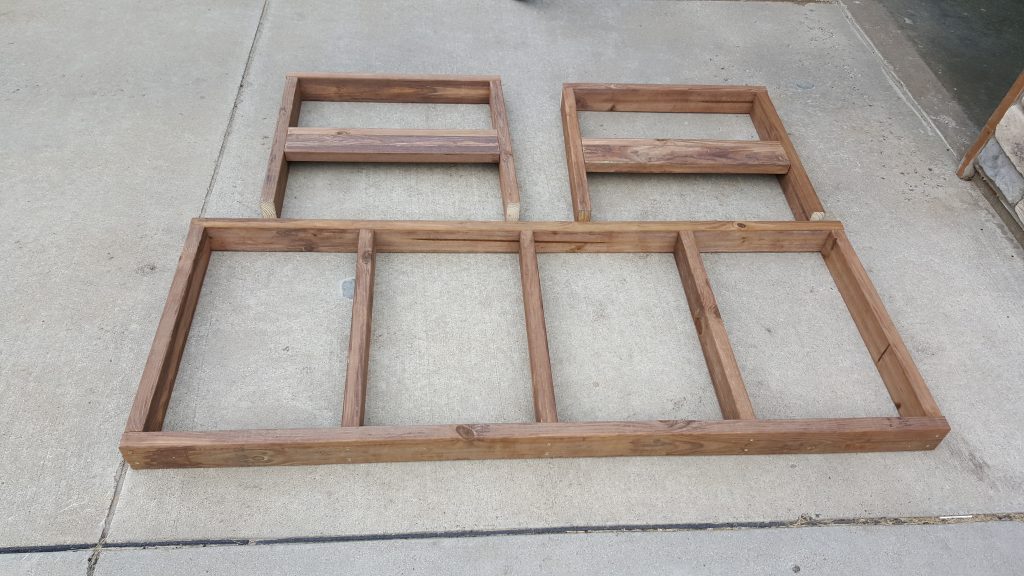
Here are all of the pieces laid out for the full couch. When we started I was not sure if I wanted to build both pieces of the sectional so I started with the full couch then bought the pieces for the partial couch after the full one was complete.
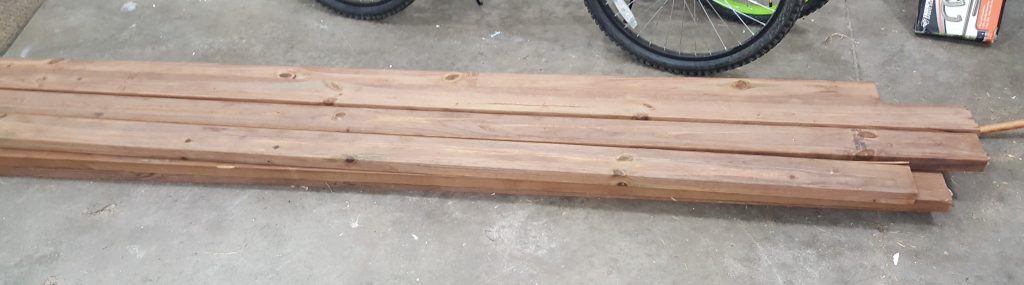
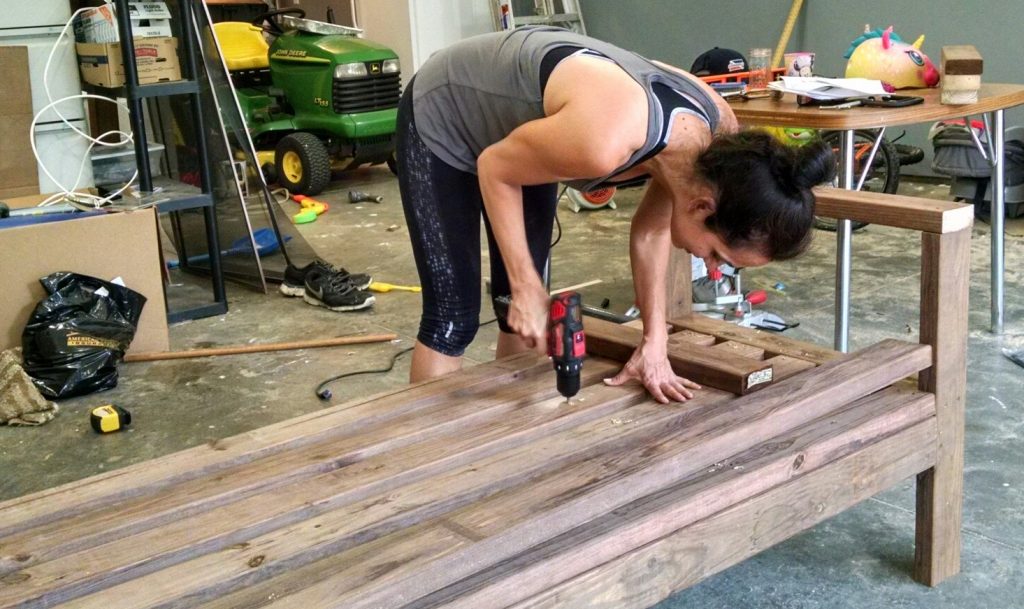
Started out cutting all the pieces according to the plans. Remember this phrase: Measure Twice, Cut Once! I explain more of this importance later but trust me, you will thank me later if you always measure two times before making any major cuts using your miter saw.
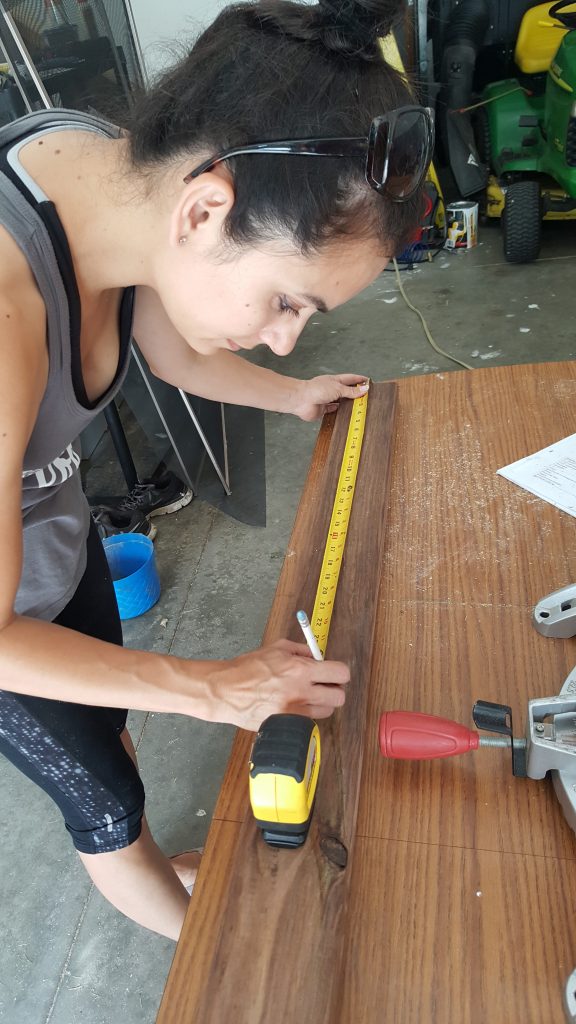
I also used chalk to label the finished cut wood so I would know which piece was which (didn’t do this at first and then was constantly measuring and remeasuring pieces when trying to assemble).
All pieces are cut!
After reading through the plans completely just follow them step by step. I feel it is helpful to lay the pieces out as they will be assembled to make sure it makes sense, everything fits, and all pieces are there. I chose to predrill the holes to make it easier to drill in the screws, but it may not be necessary.
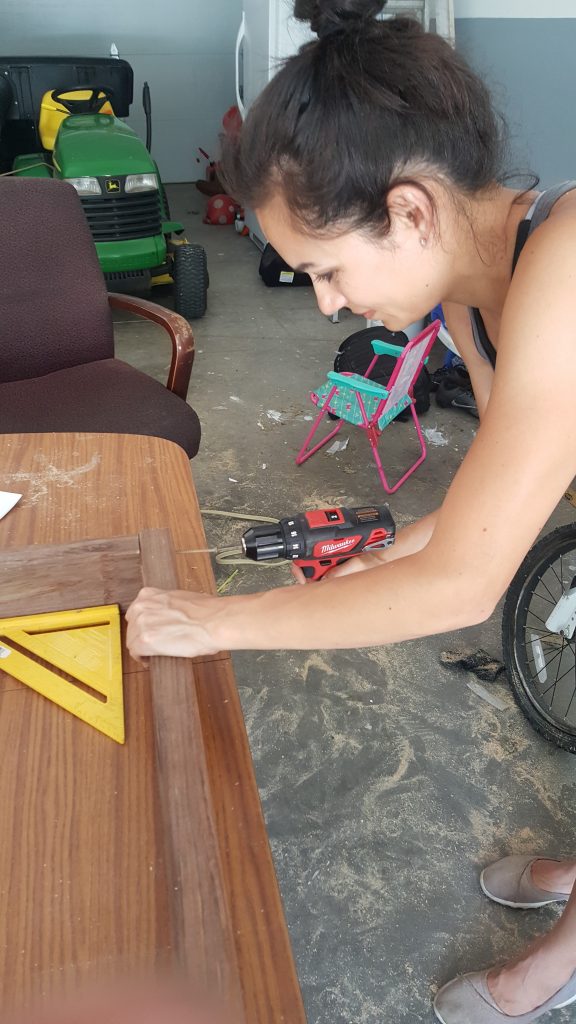
If you have access to an impact driver for putting in the screws I would highly recommend it as it makes the drilling process easier. For the first day I used a regular drill not realizing we had an impact driver (go figure) and it was tough to get the screws to go in. The second day was a totally different build as using the impact driver made screwing the pieces together 100% easier. Definitely kicking myself for that one!
According to the plans I started building the seat frame first.
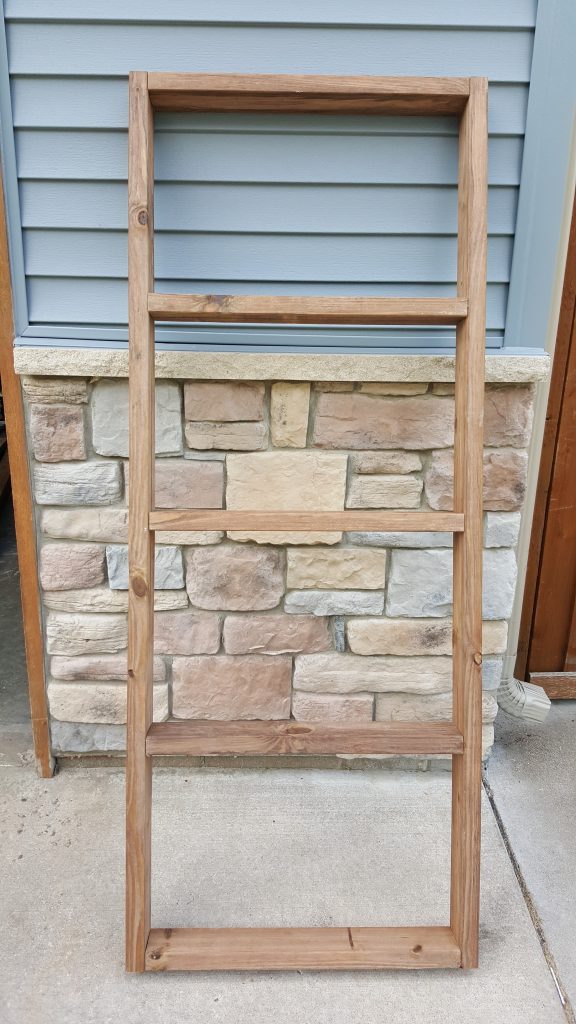
Building the seat frame was simple and quick, just be sure to consistently use a right triangle and level to make sure everything is square and level otherwise you’ll end up with a wobbly couch! Here is the completed frame.
Next was building the arms. Here are the two assembled sides/arms.
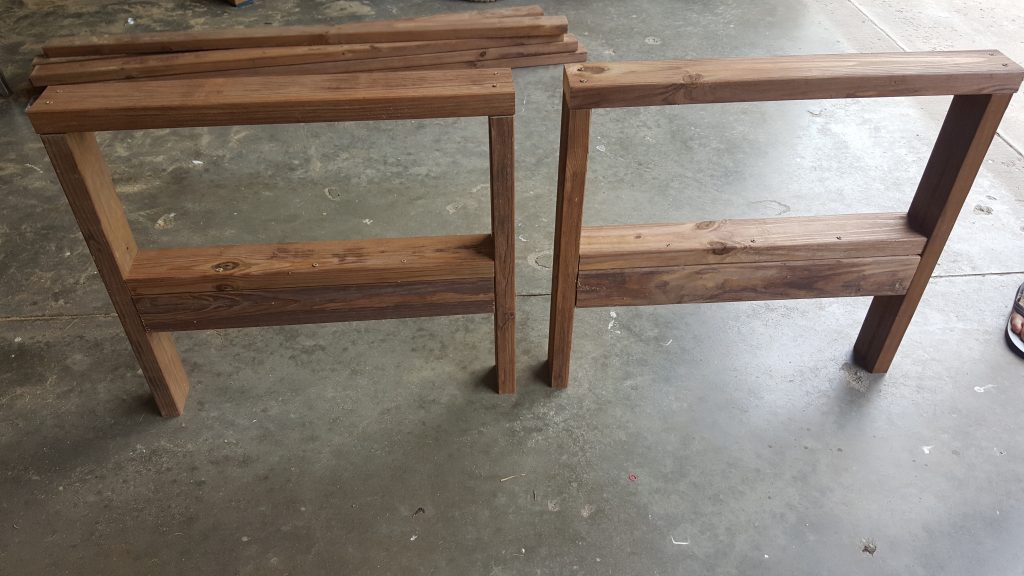
Now just attach the arms to the seat frame. Again, highly important to make sure everything is square and level. You can see below what the three completed pieces look like assembled before attaching together.
Attaching the seat slats was very easy and I used a couple pieces of scrap 2×4 to evenly space out the slats. You just screw the seat slats down to the seat frame.
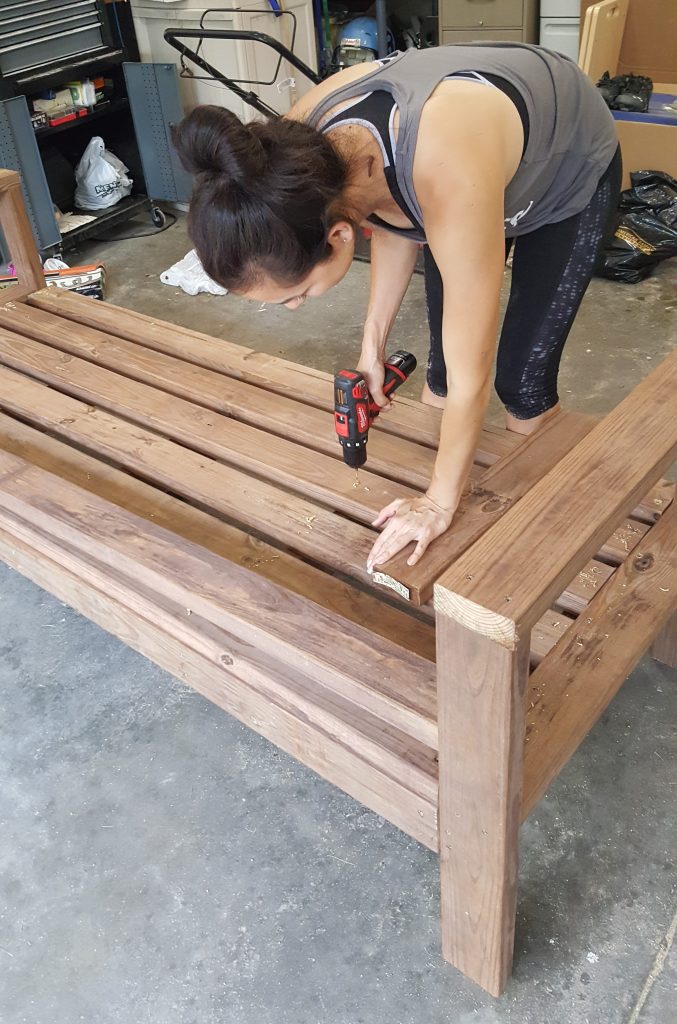
Excuse the messy garage, we were also working on renovating the garage at the same time! Photos and post of an amazing pallet wood garage wall to follow.
Last part is the back! This is the only place we used pocket hole screws. First time ever using a Kreg Jig and after reading through the instructions it was pretty easy! We chose to also add the optional support pieces to the back and under the armrests for aesthetic purposes as well as extra support. I do not have any pictures of me attaching the back and support pieces but it was easy to do. I point them out in the picture below.
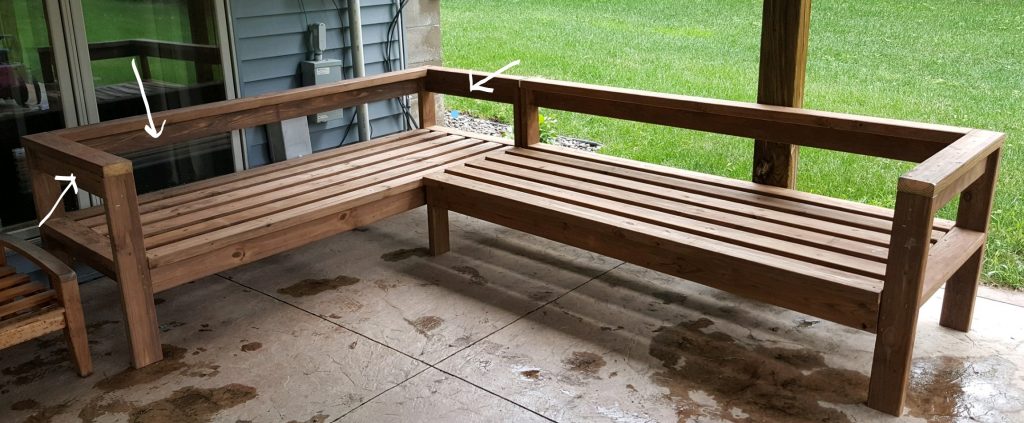
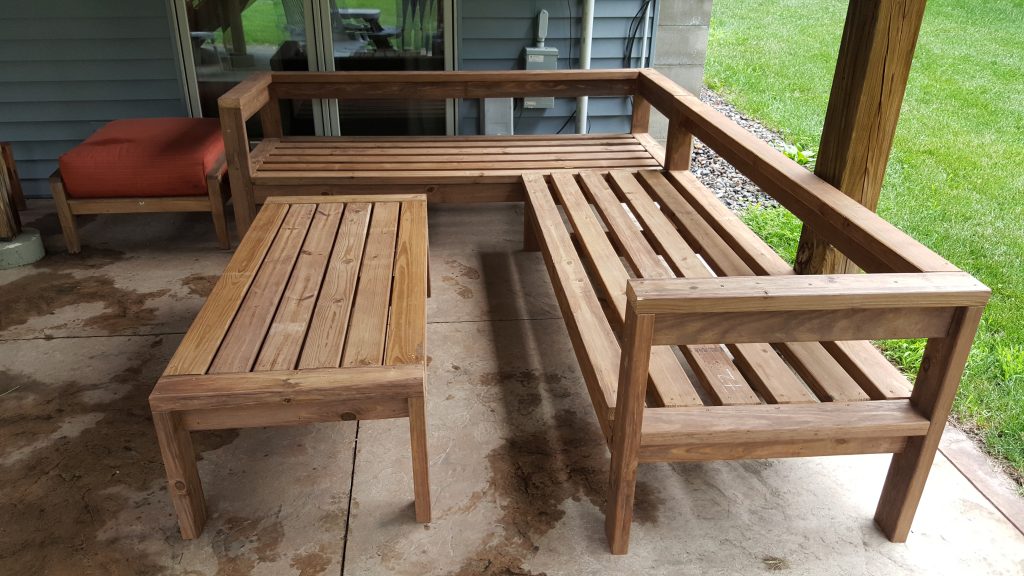
Unfortunately I did not capture any pictures of the first full couch by itself, but you can see below how the two couches fit together.
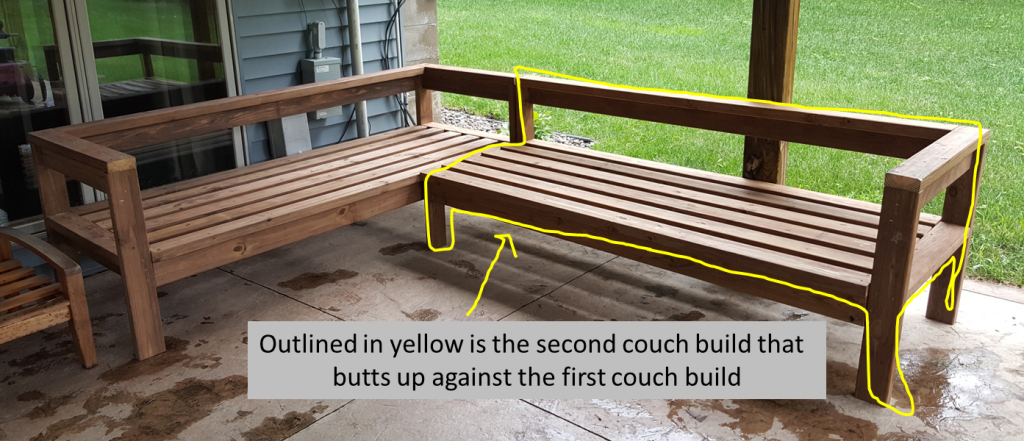
And that’s it! This would make a great outdoor couch by itself with having both armrests however we want an L-shaped sectional so we built the second couch the next day. The plans for that build are here.
Decorating
Ana used 25×25″ seat cushions for her couch and outdoor pillows, however we could not find any we liked locally so instead we went with 4 deep seat outdoor cushions and 2 25″x 25″ seat cushions and they have worked out great! Not able to link the exact cushions we used however these cushions are a great option and I also included similar cushions below. The pillows were found here and here . Have fun decorating your new sectional couch!
My Amazon Cushion Picks

Outdoor Pillows
Amazon Outdoor Pillows
Target also has some great outdoor pillow options, click here to browse their selection.
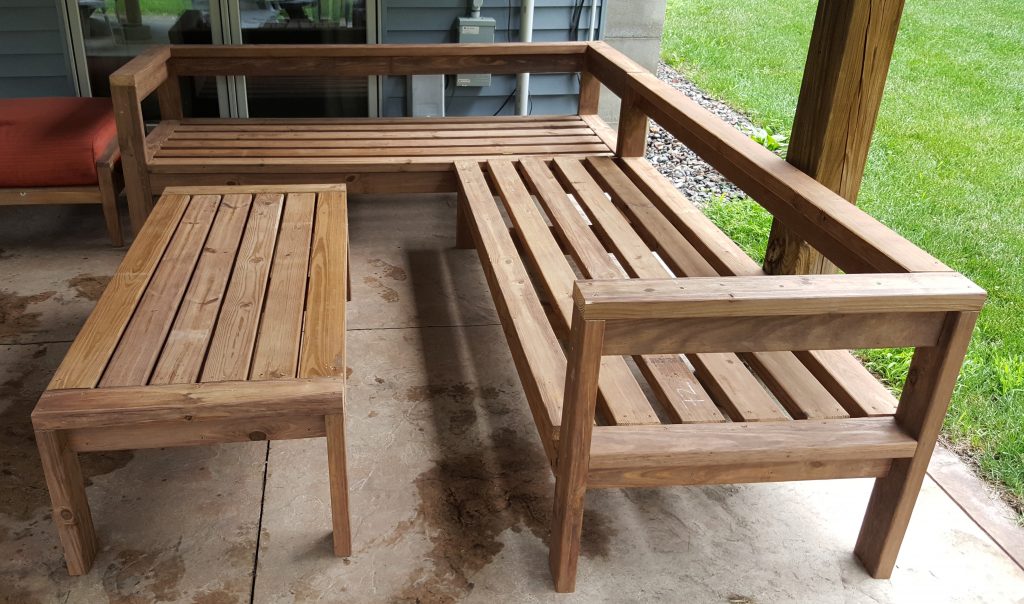
DIY Coffee Table Plans
Did we finish there? Of course not! Once we set the couch up we realized it really needed a coffee table and it just so happened that Ana White also created a coffee table that matched the couch! That build took only half a day and looks so great with the set. You can find those plans here.
Please note: Here I am covering the build of only the full couch. If you are making the partial couch that is the second part of the sectional I realized the plans are missing one piece of wood on the cut list. It is missing (1) 28 1/2″ piece so please be sure to add that to the plan.
First Time Building Tips
If this is your first time building something using plans, here are some tips I would recommend:
- Of course, always SAFETY FIRST.
- have the correct safety gear such as eye protection and know how to operate the tools and machinery, especially the miter saw.
- Always read through ALL of the plans before starting a build.
- I like to picture how things come together in my mind until it makes sense.
- Be sure to have all of the tools out and ready to go
- MEASURE TWICE, CUT ONCE!!!
- Meaning anything you are planning to cut with the miter saw be sure to measure it twice before cutting! Trust me on this!
- This is a big one if you want to avoid making cutting mistakes and needing to buy more lumber. It may seem simple, but it is amazing how many times I’ll be slightly off on a measurement that I was so sure was right.
- Have extra screws
- mistakes happen, and when they do you may end up sacrificing a screw or two. The worst thing is to be in the groove drilling in screws when suddenly you run out and have to stop everything!
- Print out the plans so you can write on them
- I like having a physical copy as opposed to looking on my phone or tablet because I can jot down thoughts, ideas, and changes I’ve made to the plan for future use and in case I need to adjust anything.
All right! Hopefully this post helped if you were thinking about building your own DIY outdoor sectional. I talk a lot, but really when it came down to it this build was pretty simple, did not take a lot of time, and turned out amazing!
If you build this or you like me sharing about different builds please let me know in the comments below and share pictures of what you have built!
Thank you and good luck!


26 Comments
Anne
Hi! Love this idea. Can you put/do they fit- back cushions on both sides of the couches? I noticed that Anna didn’t have cushions all the way around hers either- I’m assuming that this is just for the photos. Also, now that you’ve had it a while? Is t comfortable? Do they back pieces come up far enough that he cushions don’t fall over? Thanks for your help! Trying to decided if I should go for it!
Crystal D Archer
You should definitely go for it! Cushions can go all the way around and I would not recommend the cushions I had purchased. I was in a hurry to get it all done before the 4th of July last year and bought cushions that were meant for chairs so the back cushions are too high. I would recommend getting separate back cushions that are only a few inches higher than the back of the couch, I found some great ones at At Home. Please let me know if you have any other questions along the way, it was a fun build and we use the couch every day! Incredibly comfy and seats lots of people. Thank you!
Shilo
Crystal, love this! We just moved and have a nice deck and patio below and would love to build something like this, how has it held up? Especially with our MN winter? We wouldn’t have space to store ours in a shed and would probably have to cover under the deck for the winter. Thanks!
Crystal D Archer
Hey Shilo!!! It has held up great and is still incredibly strong and sturdy. Under the deck would be fine, maybe just throw a tarp over it to keep snow from just sitting on it if any snow gets under the deck. Let me know how it goes, it is such a great and fun build!
Bhuvana
Thank you for your post and links to the plans. We made a U sectional and it came out great
Crystal D Archer
That’s so great to hear, glad it worked out well! Would love to see a photo of the finished sectional, always fun to see people’s work! Thank you again-
Michael A.
Greetings, was looking at DIY plans on Pinterest and ran across your DIY sectional and was quite impressed with your build and finished project. However, I have a couple of questions if you could please reply.
1) I tried to follow the link (2nd Here) for the partial sectional, I’m assuming it’s the one without the arms on each end, but it seems to be directing me to the exact same plans as the original, with arms on each end. Do you have a newer link or could you supply a photo or How-To for completing the open ends?
2) I noticed in the plans that they have the top measurement at 27″ high, if I want to alter this to 30″ height at what height would you recommend the bench (seat height) be constructed at? I was thinking 16″ My reasoning is that I may have found the cushions for the backs and it would be nice to have an extra 3″ in height to the back for better overall support. Thanks!
Crystal D Archer
Hi Michael, excited that you are interested in this build! I went back through and the original plan link must have changed so thank you for finding this. I found the plans at https://www.ana-white.com/woodworking-projects/one-arm-2×4-outdoor-sofa-sectional-piece and it does not seem to have a separate printable plan, you need to scroll through the page to follow the plan (or print the entire page). It is a pretty simple build. In looking for the link I also found she has an armless plan in case you want to make a U shaped sectional which is found here: https://www.ana-white.com/woodworking-projects/armless-2×4-outdoor-sofa-sectional-piece?page=1 I actually think I may build this next! As far as the height adjustment I am going to run the question by my husband for his recommendation and get back to you if that is ok. Please let me know if you have any other questions!
Gina
Hey there! How much did this cost you, without the cushions?
Crystal D Archer
Hello! Total cost including the coffee table and both sections of the couch, without the cushions was about $300. I used cedar toned treated wood so the type of wood used would impact the total cost. For example if a raw wood was used it would be less expensive overall, but would need to be stained. Thanks!
Hope
I love this so much! What was the estimated cost to build yourself?
Crystal D Archer
Hello and thank you so much! Total including the coffee table and both parts of the sectional was around $300, we used cedar tone treated wood. Depending on the type of wood used would impact the cost, for example if you used a wood that was not treated it would be less expensive, but you would need to stain it. Overall it was very cost effective!
MacKenzie Johnson
What type of wood did you use?
Crystal D Archer
Hello!! I used cedar tone treated wood and it has held up very well!
Melody
Hi! I see in some pictures off to the side it looks like there might be some chairs! Do you have plans for how to make those?
Crystal D Archer
Those are actually foot stools that we bought at an estate sale but I have definitely been looking at some different outdoor chair plans to build! They would be an easy build, though, very basic structure. Hopefully I can build and post some soon! Thank you for the question
AMY
I know this post is kind of old now but we’re planning on trying this out this summer, i was wonderding a general cost estimate on the wood
thanks.
Crystal D Archer
Hi, I was actually just updating the post last night! Cost depends on the type of wood you purchase, we used cedar toned treated wood which I would say is in the mid-range for wood pricing. It cost us about $300 total for both couches and coffee table at the time. If you went with a raw wood the wood cost would be less, but it would need to be stained or treated. Hope this helps, thanks!
DeAnn
I love this Crystal. I am saving the plans for the boys to build this summer. We are getting a new deck this summer and this would look awesome on it.
Crystal D Archer
Thank you so much DeAnn, I really appreciate it! This is the perfect time to make a couch, and I bet the boys would have a great time doing it! You’ll have to send me a picture when it is done. Hope you are doing well! 🙂
Milika
Hi Crystal, I know you built this a while ago so Im wondering what you would do differently if you were to do it over now. Ie never built anything in my life but my husband and I are going to try to build this in the next week or so. I see a lot of comments about slanting the back of the couch for more comfort while sitting. What would you do differently?
Thanks!
Crystal D Archer
Hello! First of all good for you for trying something new, you will be great! It really is a simple build and fun. I do think slanting the back would make it more comfortable as well as help cushions/pillows from falling forward so that is definitely something I would try differently. I’ve also thought about adding a piece of wood across the back of the seat to keep from the seat cushions from pushing off the back of the couch. Other than that I would keep it all the same! Excited for your build and let me know how it goes!
Thanks, Crystal
Tanya Mancuso
Hi Crystal. I’m having a new deck built and want to build the L-shaped couch to sit in the corner under the gazebo! You mentioned in an earlier post that if you had to do it again, you’d slant the backrest. How? would that require different supports? I’ve built a few things from Ana’s plans before and can follow them pretty well but when it comes time to modifying them, I’m a little hesitant.
Any ideas on how to slant the backrest?
Thanks
Tanya
Crystal D Archer
Hi Tanya, thank you for your question and love that you’ve built Ana’s plans before! I found one of Ana’s builds for an outdoor modern chair at this link https://www.ana-white.com/woodworking-projects/simple-modern-outdoor-chair and was thinking how she did the back for that might work for the back of the couch, just not as high. I would just make them to the height of the back of the couch. I hope this helps and if you try this please let me know how it goes! Thank you- Crystal
Korrin Brickman
hi! i’m thinking about doing this and was wondering how much it cost for all of the cushions you have?
Jessica Varga
Hi Crystal!
I notice the original plan you posted for the couch has 2-3/4″ deck screws but it looks like you just used 2-1/2″ deck screws for the project. Is that correct and do you feel like it worked well? Thank you! I’m so excited to try this!!